Flows v4.0.1 documentation
Manual
Variables: ve3.fourier.3aims.com, example-staging, examplesite
Chapter 1: Getting Started
Flows is a web framework designed and developed from scratch by James Gardner. It aims to be both the simplest and the most powerful web framework available. It achieves this through careful design that promotes a way of working which is closely coupled to the restrictions and affordances of the underlying technologies rather than follow current trends. As a result Flows is both radically new and strikingly old-skool.
Flows favours correctness over shortcuts but this turns out to make Flows very easy to use.
Creating a New Flows Project
To create a new Flows project visit http://3aims.com/flows/new and enter some basic project information including:
- Project package name
- Development machine name (can be a name you have made up but it is usually better to specify a hostname)
- Production server name
Your new project will be returned as a .tar.gz file, complete with all its dependencies. You will then be redirected to a version of this page which has been customised to reflect your specific package.
Let’s imagine you have chosen ExampleSite as your package name and dev.example.com as your development machine name.
You can then run these commands to install your application:
tar zxfv ExampleSite.tar.gz
cd ExampleSite/deploy
python virtualenv.py ../../env
cd ../code/trunk
../../../env/bin/python setup.py develop -f ../../dist
You then navigate to the correct directory:
cd ../../deploy/dev.example.com/examplesite-dev/
and use this command to serve it:
../../../env/bin/python2.5 -m flows.run examplesite.conf serve
|-------------------------|------------|----------------|-------|
 the python                run          the config to    the
 installation to use       flows        use              command
                                                         to run
You can now visit your development site by opening a browser and pointing at http://127.0.0.1:8000 where you will be greeted with this:
This is the index.html file in the ExampleSite/code/trunk/examplesite/static directory. The static directory is a bit like an Apache htdocs directroy. It is where you put HTML files and images which you want to be publicly available. Try changing the index.html page and refreshing your browser. You’ll see the page changes too.
Chapter 2: Flows Scripts
Hello World!
Now that you’ve seen how to get Flows to serve static files, let’s write a simple script. Serious Flows applications aren’t written as scripts but scripts are a great way to get started.
Create a file in the static directory called hello.flo. Flows treats sall .flo files in static directory as scripts[#]_. All flows scripts have a single global variable named flow which provides access to all the Flows tools as well as information about the current request.
Add the following content to hello.flo:
flow.http.response.body.append(u"Hello World!")
Now with the server still running visit http://127.0.0.1:8000/hello.flo and you will see this:
Hello World!
You should never use print statements in a Flows script. Instead all Flows scripts and applications return data to the browser by changing the flow.http.response object.
By default this object is a list so we can simply append the string we want returned. The u in front of "Hello World!" tells Python to treat the string as Unicode. Flows always expects everything to be Unicode. Let’s change the message to an Arabic greeting. Update the file to look like this:
flow.http.response.body.append(u"\u0627\u0644\u0633\u0644\u0627\u0645 \u0639\u0644\u064a\u0643\u0645")
Each number prepended with \u represents a different Unicode character. Although it looks complex, these escape sequences are just Python’s way of dealing with unusual characters.
With the server still running, refresh the browser and you should see the following greeting:
السلام عليكم
Dealing with all the escape sequences in the source file is a bit cumbersome but there is a way to improve things. Set your editor to save files using the UTF-8 encoding (in vim issue the command :set encoding=utf8, in Emacs no change is required) and then replace the contents of the file with the version below, making sure there are no empty lines at the top of the file:
# -*- coding: utf8 -*-

flow.http.response.body.append(u"السلام عليكم")
This is clearly a lot neater. If you refesh the browser you’ll see the same message as before.
The first line in the file is simply a comment that tells Python that the file is encoded as UTF-8 so that it knows how to handle any Unicode characters in the file. The comment must always be the very first line of the script.
Believe it or not, handling Unicode characters like this is considered very difficult in some frameworks. In Flows it is simple.
Understanding HTTP
When a user types a URL into a website the first part of the URL determines the protocol to use. The http:// part of a URL means the communication will be performed over the HyperText Transfer Protocol. To be an effective web developer it helps to understand how the protocol works.
When a browser sends a request it does so in two parts: the headers and the body. A typical HTTP request for the hello.flo script might look like this:
GET /hello.flo HTTP/1.1
Host: 127.0.0.1:8000
User-Agent: Mozilla/5.0 (X11; U; Linux x86_64; en-GB; rv:1.9.0.15) Gecko/2009102815 Ubuntu/9.04 (jaunty) Firefox/3.0.15
Accept: text/html,application/xhtml+xml,application/xml;q=0.9,*/*;q=0.8
Accept-Language: en-gb,en;q=0.5
Accept-Encoding: gzip,deflate
Accept-Charset: ISO-8859-1,utf-8;q=0.7,*;q=0.7
Keep-Alive: 300
Connection: keep-alive
Cache-Control: max-age=0
The first line is important. It says that the request method is GET and that version 1.1 of the HTTP protocol is going to be used. GET HTTP requests do not have a body so the lines that follow are all HTTP request headers.
To demonstrate that nothing clever is going on, make sure the server is still running and then connect to it using telnet on port 8000 like this:
$ telnet 127.0.0.1 8000
Trying 127.0.0.1...
Connected to 127.0.0.1.
Escape character is '^]'.
Now type the following HTTP request lines exactly as they are below and then press ENTER twice to signal the end of the HTTP request. You can type all the other lines from the example request above too if you like but the current hello.flo script won’t take advantage of the extra information anyway so the simpler HTTP request will work fine.
GET /hello.flo HTTP/1.1
Host: 127.0.0.1:8000
After pressing ENTER twice the server responds with an HTTP response shown below:
HTTP/1.0 200 OK
Server: PasteWSGIServer/0.5 Python/2.5.2
Date: Mon, 02 Nov 2009 17:31:18 GMT
Content-Type: text/html; charset=utf-8
Connection: close

السلام عليكم
The important parts of the HTTP response from a web development point of view are the status, the headers and the body. The status forms part of the first line of the response. In this example it is 200 OK. The number 200 is the code and the rest of the status is a customisable message. The response body is the message السلام عليكم which is actually encoded as UTF-8 data. The headers are all the lines in-between. The body and headers are separated by a blank line.
Part of the philosophy of Flows is that web development needn’t be more complicated than managing flows of data. In this example, data flows into your application via the HTTP request and flows out via the HTTP response. Your flows script just has to manage the bit in-between.
You’ve already seen how to change the HTTP response body (you simply append data to it) but you can also change the response status and headers equally easily.
Let’s write a new script to see what the default status, headers and body are. Save the lines below into http.flo:
# -*- coding: utf8 -*-

response = "Defaults - Status: %r, Headers: %r, Response: %r" % (
    flow.http.response.status,
    flow.http.response.headers,
    flow.http.response.body,
)
flow.http.response.body.append(response)
If you run this script you’ll see the following output:
Defaults - Status: '200 OK', Headers: [('Content-Type', 'text/html; charset=utf-8')], Response: []
By default the HTTP response status is set to 200 OK, the headers are set to [('Content-Type': 'text/html; charset=utf-8')] and the body is empty. The extra headers you recieved while using telnet were set by the server after your Flows script had done its work so you have no control over those from Flows.
So far we’ve been telling the browser that the content type which follows in the HTTP response body is of MIME type text/html but the result is clearly not HTML. Let’s change the content type to text/plain:
# -*- coding: utf8 -*-

response = "Defaults - Status: %r, Headers: %r, Response: %r" % (
    flow.http.response.status,
    flow.http.response.headers,
    flow.http.response.body,
)
flow.http.response.headers = [('Content-Type', 'text/plain; charset=utf-8')]
flow.http.response.body.append(response)
If you run this script you’ll see the browser now renders the result as plain text because the content type is correct. Notice that we’ve actually replaced the whole headers list in this example. We could have just changed the existing headers too. Both approaches work equally well.
So far all the examples have used an HTTP response status of 200 OK but there are other HTTP response status codes you can use too, each with different meanings. Commonly used statuses include:
- 500 Internal Server Error
- 404 Not Found
- 401 Not Authenticated
- 403 Forbidden
Here’s an example which generates a 403 Forbidden response. Save it as forbidden.flo in the static directory:
# -*- coding: utf8 -*-

flow.http.response.status = '403 Forbidden'
flow.http.response.body.append(u'Forbidden')
You can test the example by visiting http://127.0.0.1:8000/forbidden.flo. You will see the word Forbidden returned.
Tip
If you return a 404 Not Found response from a Flows script, the request will be passed on to the dynamic application if there is one so you may not get a 404 response actually returned to the browser.
You can disable this behaviour by specifying:
   flow.app.try_next = False

Then Flows will always return the response without passing it further down
the stack.
Understanding Error Documents
When using custom status codes it is useful to also send some HTML data in the response body so that the user can tell what the problem was. You can use the Flows ErrorDocumentService to assist with this. Of course you could return an HTML page you have put together yourself but Flows provides an error document framework service which makes this easier.
Flows uses a micro-framework architecture where each part of the framework is handled by a separate framework service. This architecture means that each request can be handled differently so that only the services that are needed are lodaed on each request. This adaptive behaviour makes Flows very efficient because there is no wasted processing but it also means you have to explicitly start the services you want to use if they aren’t already present.
Let’s modify the forbidden.flo example to use an error document. First start the error documents framework service if it isn’t already present:
# -*- coding: utf8 -*-

if flow.has_key('error_document'):
    flow.provider.start('error_document')
Now you can use the error document service to return an HTML page:
flow.http.response.status = '403 Forbidden'
flow.http.response.body.append(flow.error_document.render())
The flow.error_document.render() function takes a number of arguments to specify the type of error document to display. When it is called without arguments, like the example above, it obtains the information it needs from the current value of flow.http.response.status.
If you test the example again it will produce this HTML page:
Using Templates
The page rendered by the error document code is actually created from a template named error.dwt. You can find the template in the Templates directory. You can change this template to change how error documents look.
If you open up the template you’ll see that the comments mark out certain regions as being editable. Look for TemplateBeginEditable and TemplateEndEditable comments. Each region has a name and the content of these editable regions is replaced when the template is rendered.
Let’s re-write the forbidden.flo example again and render the template manually:
# -*- coding: utf8 -*-

import os
from dreamweavertemplate import DWT

template = DWT(
    filename=os.path.join(
        flow.config.app.app_dir,
        'static',
        'Templates',
        'error.dwt'
    )
)
template['heading'] = u'Error 403'
template['doctitle'] = u'<title>Error 403</title>'
template['content'] = u'Forbidden'
result = template.save_as_page(
    new_path=flow.http.environ['PATH_INFO'][1:],
    template_path='Templates'
)

flow.http.response.status = '403 Forbidden'
flow.http.response.append(result)
There are some important points here:
- You need to use an import statement to use the DWT class which parses the template
- We use the flow.config.app.app_dir variable to find out where the examplesite module actually is on the filesystem
- We use os.path.join() to get the full path to the error template
- The template object behaves a bit like a dictionary allowing you to set the different editable regions
- The doctitle editable region includes the <title> and </title> tags. If you forget them the page title will not be displayed correctly.
- To generate the actual HTML page we need to know where it will be displayed so that all the paths it contains are correct. flow.http.environ['PATH_INFO'][1:] is always the URL path of the page which cannot be found on the current request and Templates is always the URL path of the static/Templats directory.
As you can see there is quite a lot of work here and it would be irritating if you had to go through each of these steps every time you wanted to render a template. Instead Flows provides the template framework service. You can use it like this (save as template.flo):
# -*- coding: utf8 -*-


if not flow.has_key('template'):
    flow.provider.start('template')
result = flow.template.render(
    'error.dwt',
    dict(
        heading = u'Error 403',
        doctitle = u'<title>Error 403</title>',
        content = u'Forbidden',
    ),
)
flow.http.response.status = '403 Forbidden'
flow.http.response.body.append(result)
You can also specify new_path and template_path if you like but the defaults are used if you don’t.
In addition to the error.dwt there is also a main.dwt template which will be used by any extensions you use by default and which is used for the static HTML pages in your site. You can of course also create new templates.
In addition to templates, there are also library items. These are effectively HTML fragments which can be used in templates or in editable regions. When you change the library item, all the resources which use it can be automatically updated, with the links corrected for the page or template containing them.
The default example comes with two library items:
- Library/main_nav.lbi
- Navigation links
- Library/footer.lbi
- Information to go in the footer
By using templates and library items effectively you can manage complex sites without needing any Python code whatsoever.
The templates and library items are compatible with Adobe Dreamweaver so if you have a copy you can manage your site directly with your program. The static directory is just a Dreamweaver site. If you do not have Dreamweaver you can use SiteTool instead. It is a command line implementation of the Dreamweaver functionality.
As an example let’s change the footer. First install SiteTool:
easy_install SiteTool
Now change the footer by editing footer.lbi (perhaps update the copyright information).
Finally navigate to the static directory and execute the update command:
cd static
python -m sitetool.command update -Lr -s . -S .
Now the templates and HTML pages will have been updated.
See the SiteTool documentation for information on managing the files in the static directory.
Using Forms
Creating Forms in Python can be tedious. FormBuild can help, particularly if you want all the forms in a site to have a consistent style.
Create a dynamic/form.py file with the following content:
from formbuild import Form

class StandardForm(Form):
    pass
All your forms can now be built with StandardForm which means that if you ever need to customise the look and feel or behaviour of all your forms, you can do so in one place by customising your project’s StandardForm class.
In FormBuild there are three important variables:
- values
- A dictionary where each key is a field name and each value is the value it takes.
- errors
- A dictionary where each key is a field name and each value is a string representing an error associated with the current value of a field.
- options
- Certain field types such as checkbox groups are made up of various different options of which the user picks one. Often the available options are determined at run-time based on other factors so the options variable is used to specify the available options for a particular instance of a form for the types of fields which take options.
Now use the form like this. In the application code create a form instance for each form you want to create:
from yourapp.dynamic.form import StandardForm

form = StandardForm(
    values = {
        'firstname': u'James',
        'surname': u'',
        'hobbies': [u'1', u'4'],
    },
    errors = {
        'surname': u'Please enter a surname',
        'hobbies': u'Please choose from the available options, there is no option 4.',
    },
    options = {
        'hobbies': [
            (u'1', u'Programming'),
            (u'2', u'Swimming'),
            (u'3', u'Reading Fiction Books'),
        ],
        'salutation': [
            (u'0', u'--Please select--'),
            (u'1', u'Mr'),
            (u'2', u'Mrs'),
            (u'3', u'Ms'),
            (u'4', u'Dr'),
        ]
    }
)
How you generate the values, errors and options is down to your application. FormConvert can help in the conversion of values from HTTP post data to the values you need and back again.
Notice that all the valus are Unicode strings. The options are a list of (value, label) pairs and although the values here are consecutive numbers represented as strings, you could use and values you like.
Now the form instance exists you can use it to build a form. Usually this would be done in a template but the example here uses plain Python. Whilst you can build the HTML structure yourself and add indivudual fields, here we are using FormBuild’s built-in layout tools:
lines = [
    form.start_with_layout(
        '/form/submit.py',
        table_class='form',
    ),
    form.title('<h2>Personal Details</h2>', escape=True),
    form.field(
        label="Salutation",
        field=dict(type='dropdown', name='salutation'),
    ),
    form.field(
        label="Firstname",
        field=dict(type='text', name='firstname'),
        required=True,
    ),
    form.field(
        label="Surname",
        field=dict(type='text', name='surname'),
        required=True,
    ),
    form.title('<h2>Hobbies</h2>', escape=True),
    form.field(
        label="Hobbies",
        field=dict(type='checkbox_group', name='hobbies', require_options=True, align="vert"),
    ),
    form.action_bar(fields=[
        form.submit(name='action', value='Submit'),
    ]),
    form.end_with_layout(),
]
Here the required=True option adds an asterix to the label to show the user that the field is required, it has nothing to do with validation, it only affects the interface.
The requrire_options=True for the checkbox group tells FormBuild that it is an error if options for this field were not specified when the form instance was created from StandardForm.
To make the form look prettier you’ll probably want to add some CSS styles. This is a good example:
styles = """
/* Form Styles */

table.form td.label label {
    font-weight: bold;
    padding-right: 5px;
}
table.form .error, table.form span.required {
    font-weight: bold;
    color: #f00;
}
table.form span.small {
    font-size: 85%;
    line-height: 77%;
}
table.form td.label {
    white-space: no-wrap;
    width: 170px;
}
table.form td {
    padding-bottom: 0px;
    margin: 0px;
}
table.form td.field_desc {
    padding-bottom: 8px;
}
"""
We are using table.form in the styles because we specified table_class='form' in form.start_with_layout().
You can then put it all together like this:
page = [
    '<html>',
    '<head><title>Test Form</title>',
    '<style type="text/css">',
    styles,
    '</style>',
    '</head>',
    '<body><h1>Test Form</h1>',
    ''.join(lines),
    '</body>',
    '</html>',
]
You can then render the nested list of strings like this:
flow.http.response.append(page)
Handling POST data and query strings
In order to test this form you will need another Flows framework service called http.input. This service parses the HTTP post data and presents it as a an instance of the Python Standard Library’s cgi.FieldStorage() class.
Let’s create a new script called submit.flo to recieve the data and then print it out. It looks like this:
# -*- coding: utf8 -*-


if not flow.http.has_key('input'):
    flow.provider.start('http.input')
if flow.http.input is None:
    result = 'No form data submitted'
else:
    result = ''
    for name in flow.http.input:
        result += u'%s: %s<br />'%flow.http.input.getfirst(name)

result = flow.template.render(
    'error.dwt',
    dict(
        heading = u'Form Results',
        doctitle = u'<title>Form Results</title>',
        content = result
    ),
)
flow.http.response.append(result)
If you had not set the attribute method="post" in the HTML for the <form> tag, the data would have been submitted as a GET request. In this case the data would form part of the query string and you would need the flow.http.query service instead of the flow.http.input service [1]. There are limits to the amount of data you can submit via a query string so it is always better to use a POST request and use flow.http.input as shown in this example.
You’ll also notice that we used get_first() XXX
Using a converter
>>> from formconvert import multiDictToDict
>>>
>>> conversion = Conversion(flow.http.input).perform(multiDictToDict(encoding='utf8'))
>>> conversion.successful
True
>>> params = conversion.result
>>> params
{'age': u'28', 'name': u'James'}
Handling HTML in a safe way
If you are not careful you can end up writing code which is vunerable to cross-site scripting attacks (often written XSS attacks). If a malicious user entered the following into the field:
<a href="http://i-will-steal-your-password.com">Click here to sign
in</a><!--
The resulting page would look like this:
A user could easily be tempted to click the link and be taken to http://i-will-steal-your-password.com which could be made to look just like a normal sign in screen.
The point is that your site should always escape any untrusted data to ensure this sort of attack is not possible.
To help avoid the problem Flows provides a very simple too for helping you construct HTML fragments. It behaves just like Python’s StringIO.StringIO object but is extremely efficient and also escapes HTML automatically unless you say it is safe not to.
Here’s the same example safely escaped:
# -*- coding: utf8 -*-

from bn import HTMLFragment

if not flow.http.has_key('input'):
    flow.provider.start('http.input')
if flow.http.input is None:
    result = 'No form data submitted'
else:
    fragment = HTMLFragment()
    for name in flow.http.input:
        fragment.write(name+': ')
        fragment.write(flow.http.input.getfirst(name))
        fragment.safe(u'<br />')
    result = fragment.getvalue()
result = flow.template.render(
    'error.dwt',
    dict(
        heading = u'Form Results',
        doctitle = u'<title>Form Results</title>',
        content = result
    ),
)
flow.http.response.append(result)
This time the data is correctly escaped and the same page looks like this:
Framework Services
By default Flows starts the following compulsory framework services on each request:
- http
It then starts the following optional framework services:
- error report
It also makes the following framework services available and ready to start if you need them:
- http.input
- error_document
- template
- wsgi
You’ve already seen the template and error_document services for example.
The optional framework services are configured in your application’s framework/services.py file. By default it looks like this:
from flows.framework.service import get_default_services

def on_load_services(flow):
    available_services = {
        # Customise the available services here, eg:
        # 'your_service': YourService,
    }
    # Make sure the defaults are loaded too
    available_services.update(get_default_services())
    return available_services
The services which are always to be automatically started by Flows on each request are configured in framework/application.py which looks like this by default:
from flows.framework.application import make_application,\
   make_flows_application

def on_load_application(flow):
    application = make_application(
        flow,
        start=['error_report'],
        extra_components=[
            # Add extra components here
            # ('^/hello$', my_component)
        ]
    )
    return application
You can see that the optional error_report service gets started by default. It is one of the services returned by get_default_services() in framework/service.py.
Now create a user (you need to add the correct shell command):
$ ~/env/bin/python -m flows.run carbage-dev.conf shell
(Pdb) flow.provider.start('database')
(Pdb) flow.provider.start('user')
(Pdb) flow.user.user_create('james', '123')
(Pdb) flow.provider.stop('database')
Adding New Services
Starting Services Automatically
Logging
Logging is a critical part of Flows. If you can’t see what’s going on at different parts of your code you can’t easily track down problems. This is a particular issue when you are working in Flows error-handling code where exceptions are caught and handled instead of being displayed.
Logging is so important to effective debugging during development that Flows is quite pedantic about it. Flows itself as well as every framework service you use must have a handler set up for it or Flows will issue a warning. Of course, the handler can be configured not to show any log messages.
The default log file looks like this:
# Logging configuration

[loggers]
keys = root,flows,wsgi,http,error_report,error_document,mail,template

[logger_root]
level = WARNING
handlers = console

[handlers]
keys = console

[handler_console]
class = StreamHandler
args = (sys.stderr,)
level = NOTSET
formatter = generic
propagate = 1

[formatters]
keys = generic

[formatter_generic]
format = %(asctime)s,%(msecs)03d %(levelname)-5.5s [%(name)s] %(message)s
datefmt = %H:%M:%S

# Flows logging

[logger_flows]
level = WARNING
handlers =
qualname = flows
propagate = 1

[logger_wsgi]
level = WARNING
handlers =
qualname = httpkit.service.wsgi
propagate = 1

[logger_http]
level = WARNING
handlers =
qualname = httpkit.service.http
propagate = 1

[logger_error_report]
level = WARNING
handlers =
qualname = errorreport
propagate = 1

[logger_error_document]
level = WARNING
handlers =
qualname = errordocument
propagate = 1

[logger_mail]
level = WARNING
handlers =
qualname = mail
propagate = 1

[logger_template]
level = WARNING
handlers =
qualname = dreamweavertemplate.service
propagate = 1
As you can see it is in two parts. The first part is configuration for the Python logging system itself, the second part is the important part and it specifies how the messages from Flows and each of the framework services should be handled. Let’s look at one of the handlers in the second part in more detail:
[logger_error_report]
level = WARNING
handlers =
qualname = errorreport
propagate = 1
The only parts of this configuration you should change are marked with a word in brackets below:
[logger_(service name)]
level = (log level)
handlers =
qualname = (root logger name)
propagate = 1
In this example service name is error_report, log level is WARNING and the root logger name is errorreport. You shouldn’t change anything else.
- service name
- The service name is the same service name you would use in flows. For example if you accessed the service as flow.some_service in your application then some_service would be the service name.
- log level
- The allowed levels are ERROR, WARNING, INFO, DEBUG and NOTSET. It is not wise to set the level to ERROR otherwise you could miss important warnings from the application. Most developers will log key messages at the INFO level and very verbose debugging messages to at the DEBUG level so if you want to enable log output from a particular service you should set the level to DEBUG or INFO.
- root logger name
- This is the name of the logger to log messages from. Unless the developer of the module has done something unusual, the logger name is usually the same as the module name of the module where the log messages originate. For example, the http service code is actually in the httpkit.service.http module so the logger for it will be named httpkit.service.http. The code for the error_report service is in the errorreport module so the logger is named errorreport. If you are not sure what to use you can look at the source code for a service and find out the string used in the call to logging.getLogger(). If __name__ is used, it means that the logger name is the same as the module name.
Adding a logging for a service
When you add a new service to Flows you should also add another logging section. First add the name of the service to the keys variable of the [loggers] section and then add a handler section.
Here’s an example for adding looging for the url service which you’ll need if you are setting up a dynamic application with URL routing:
# Logging configuration

[loggers]
keys = root,flows,wsgi,http,error_report,error_document,mail,template,url

...

# Flows logging

...

[logger_url]
level = WARNING
handlers =
qualname = urlconvert.service
propagate = 1
Adding other loggers
Of course, you can also set up logging for things which aren’t Flows services. Just add a handler for them in exactly the same way but make up a name to use in the keys key and as the name of the handler section.
For example to add logging for AuthTkt you could do this:
# Logging configuration

[loggers]
keys = flows,wsgi,http,error_report,mail,authtkt

...

# Flows logging

...

[logger_authtkt]
level = DEBUG
handlers =
qualname = authtkt
propagate = 1
Logging to a File
By default, logging information is sent to stderr but you can send it to a file if you prefer. Simply change the following lines:
[logger_root]
level = WARNING
handlers = console

[handlers]
keys = console

[handler_console]
class = StreamHandler
args = (sys.stderr,)
level = NOTSET
formatter = generic
propagate = 1
to these:
[logger_root]
level = WARNING
handlers = file

[handlers]
keys = file

[handler_file]
class = FileHandler
args = ('application.log', 'a')
level = INFO
formatter = generic
propagate = 1
The log output will then go to application.log in the same directory as the config file instead.
Extensions
You should also set up loggers for all extensions as well as for any third party libraries you use.
Databases
Creating New Instances
Chapter 2: The Dynamic Component
Before moving on to Flows applications it is essential you’ve read and understood all the information about Flows Scripts, the principles are the same.
You’ve now seen the basic parts of Flows but for real-world use it is generally a very bad idea to have dynamic content generated from the static directory. Here are some reasons:
- It is vastly less efficient than a Flows Application
- It makes it harder to configure production deployments
- Tools which move static files around could break your application if they try to automatically update links
- Having applications implemented as a series of scripts makes them hard to maintain
- URLs are hard to keep up to date
- Complex code is hard to maintain as lots of unstructured, separate files
Flows Application Architecture
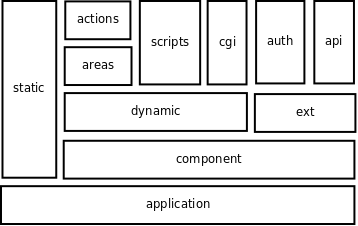
Flows applications are made of the following parts:
- framework
- Sets up flows and contains any custom framework code
- cron
- Scripts which are executed at regular intervals to perform certain tasks
- ext
- Extension componenets such as the API extensions or Auth extension
- static
- The static files directory you have already seen which contains files which don’t change and can be served directly. It can also contain Flows Scripts but as you have just learned, it is better to write components.
- dynamic
- Your application’s dynamic component. Replaces the sort of code you would usually write in
-> direct dynamic
This is the flows framework code itself which is designed to be simple enough that you can include all of Flows into your application if you wish. By default the framework files in an ordinary application
Adding a Flows Component
Adding Files to the manifest
Chapter 3: Advanced Flows
Using Extension Components
Instead of calling the dynamic component it is also possible for a URL to resolve to an extension component. These are a bit like ordinary applications except that they have already been written so you simply configure them and respond to events they expose. They set up their own services parse their own config options. To use them you follow these steps:
- Choose a name for them
- Add their configuration under the name you’ve chosen to the config file
- Create a directory in the ext directory, add two empty files to it, one called __init__.py and the other called dispatch.py
- Edit dispatch.py to create a function called on_load_component() by calling the extension’s make_component() function with any event handlers you want to override.
All event handlers look like this:
def on_some_event(flow):
    ...
Event handlers do not take any arguments other than flow and sometimes do not even return a value. Instead, all the objects they need access to are part of the flow and they will manipulate other objects in the flow. In order to allow you to write event handlers in a portable manner (in case you should ever change the name of the extension) you can always access the particular extension’s configuration as flow.config.ext, its original options as flow.config.option_group.ext and any objects it uses as flow.ext. This means that event handlers will usually work with the flow.ext object which will always contain data appropriate to that event handler.
Tip
You cannot call more than one extension per request. If you need to, perhaps your extension should really be a service (or perhaps you’ve just come across a use case I haven’t thought of yet).
This also means you cannot have anything in the config file starting ext.*.
Here’s an example implementation, without the imports:
- def config(flow, name):
- if not flow.config.option_group.has_key(name):
- raise handle_section_on_validation_error(
flow, name, “’%s.to’, ‘%s.private_key’ and ‘%s.public_key’”%(
name, name, name
)
)
# Write your converter here converter = ...
- conversion = Conversion(flow.config.option_group[name]).perform(
- converter, flow,
) if not conversion.successful:
handle_option_on_validation_error(conversion, name)
- else:
- flow.config[name] = conversion.result
return flow.config[name]
- def make_component(
- name, event_handler1, event_handler2, ...
):
- def run(flow):
# Expose any event handlers flow[‘ext’] = AttributeDict(
event_handler1=event_handler1,) # Do something here: flow.http.response.body = event_handler1(flow)
# Customise this to specify all the services to start required_services = [‘http.input’, ‘template’]
# Customise this to specify all the available services available_services = {
‘http.input’: HTTPInputService, ‘mail’: MailService, ‘template’: DreamweaverTemplateService,}
# This is always the same: def on_load_component(flow):
flow.config[name] = config(flow, name) if flow.config.has_key(‘ext’):
raise Exception(‘Extension configuration is already present’)
- else:
- flow.config[‘ext’] = flow.config[name]
- def dispatch_contact_form(flow):
f = flow.copy() del f[‘provider’] start_flow(
run, provider = ServiceProvider(
existing_services = f, available_services = available_services,), required_services=required_services,
)
return dispatch_contact_form
return on_load_component
The Auth Extension
The auth extension handles user sign in and sign out
- Create the ext directory
- Create an empty __init__.py file in the ext directory
- Add the auth directroy to it
- Customise the validate_sub() function in ext/auth/dispatch.py to look like this:
def validate_sub(flow, username, password):
    result = {'valid': username==password}
    return result
This will allow anyone to log in if there username is the same as their password.
You then simply need to enable the extension by adding auth to the app.auto_connect option in the config file:
app.auto_connect = auth
The extension will then be available at your application’s /auth/ URL.
Of course you will then need to configure AuthTkt as usual. Specify the AuthTkt config file like this:
auth.filename = path/to/apache/config.conf
If you aren’t using Apache you can create a file called authtkt.conf like this instead:
TKTAuthSecret "7426158k-31b8-9244-aec7-g1e1abf842bb"
TKTAuthLoginURL http://example.com:8000/auth/login
TKTAuthIgnoreIP off
TKTAuthGuestLogin off
TKTAuthDomain example.com
TKTAuthUnauthURL http://example.com:8000/auth/login?unauth=1
Either way, ensure that you change the value of TKTAuthSecret to a unique value for your site, and keep it a secret.
Specify the template to use like this (paths relative to the static/Templates directory):
auth.template = admin.dwt
If the template doesn’t exist a plain HTML version is used. If no template is specified, the error template is used.
Finally, specify the secret again:
auth.secret = 7426158k-31b8-9244-aec7-g1e1abf842bb
You need to do this because if you were using Apache for deployment you are not likely to be able to specify TKTAuthSecret in the same file as the other options so you need another way to tell AuthTkt.
Add the extension like this:
# -*- coding: utf-8 -*-

import authtkt.ext

from database.service.connection import DatabaseConnectionService
from usermanager.service import PostgresqlUserService
from usermanager.driver.base import NoSuchUserError

def validate_sub(flow):
    result = {}
    try:
        result['valid'] = flow.user.user_has_password(
            flow.ext.username,
            flow.ext.password,
        )
    except NoSuchUserError:
        result['valid'] = False
    if result['valid']:
        result['tokens'] = ['one', 'two', 'three']
        result['data'] = 'user_data'
    return result

on_load_component = authtkt.ext.make_component(
    'auth',
    validate_sub = validate_sub,
    extra_available_services = {
        'database': DatabaseConnectionService,
        'user': PostgresqlUserService,
    },
    extra_required_services = ['database', 'user'],
)
You can now test it out at http://127.0.0.1:8000/auth/login
Note
If you get the following message when you test the example and you really do have cookies enabled it is likely that you haven’t replaced example.com with the correct domain you are testing on:
Your browser does not appear to support cookies or has cookie support disabled. This site requires cookies - please turn cookie support on or try again using a different browser.
When you sign in you’ll see this message:
Signed in
In all likelyhood you will want to be redirected somewhere else. # XXX
Looking up a user in a database
Start the extra services:
You’ll also need to the user service so you can check usernames and passwors.
from usermanager.service import PostgresqlUserService
‘user’: PostgresqlUserService, ‘database’: DatabaseConnectionService,from database.service.connection import DatabaseConnectionService
Update the validator:
def validate_sub(flow, username, password):
database_started = False if not flow.has_key(‘user’):
flow.provider.start(‘user’)
- if not flow.has_key(‘database’):
- flow.provider.start(‘database’) database_started=True
- try:
- result = flow.user.user_has_password(username, password)
- except usermanager.driver.base.NoSuchUserError:
- if database_started:
- flow.provider.stop(‘database’)
return False
- except:
- if database_started:
- flow.provider.error(‘database’) raise
- else:
- if database_started:
- flow.provider.stop(‘database’)
return result
Checking Permissions
- The auth ticket service.
from authtkit.service import AuthTktService
‘ticket’: AuthTktService,
from permissionkit.user import is_valid_user from permissionkit.check import proceed_if
- def return_401_response(flow):
- if not flow.has_key(‘error_document’):
- flow.provider.start(‘error_document’)
flow.error_document.render(status=‘401 Unauthorised’)
@proceed_if(is_valid_user, on_fail=return_401_response) def on_action_auth(flow):
flow.auth.logout() return ‘Signed in!’ + flow.auth.data + ‘,’.join(flow.auth.tokens)
- def on_action_auth_un(flow):
- return flow.http.environ.get(‘REMOTE_USER’) or ‘None’
The API Extension
from flows.service.api import make_component

on_load_component = make_component(
    'api',
    required_services = [
        'http.input',
        'api',
    ]
)
Enable it in the config file:
app.auto_connect = auth, api
Now you can visit URLs like /api/data/add to add data. If you need to pass them arguments you post them with the args variable containg a JSON data structure of key:value pairs representing the arguments. The return value is always a JSON data structure.
To use the API extension from Python code you can use the API service.
Add it to you app like this:
from flows.service.api import APIService

{
    'api': APIService
}
You can then use it like this:
answer = service.api(‘data.add’)[‘answer’]
The service expects a valid NestedRecord data structure and will return one too.
- answer = service.api(
- ‘data.calculate’, conversion.result,
)
The Contact Form Extension
Understanding the Flows Framework
The Provider
The Flows Application (Flows and WSGI)
Enforcing Config Options
Writing Flows Framework Services
Creating a CRON Job
#!/home/example-staging/env/bin/python

import os
import logging
import sys

from flows.provider import ServiceProvider, start_flow, create_config

logging.basicConfig()

def on_run_cron_job(flow):
    # We should run as if we are in the deploy directory
    print os.getcwd()
    # We have the database flow read to go
    print flow.has_key('database')

if __name__ == '__main__':

    from database.service.connection import DatabaseConnectionService

    config = create_config(sys.argv[1])
    start_flow(
        on_run_cron_job,
        provider = ServiceProvider(
            existing_services=dict(config=config),
            available_services=dict(database=DatabaseConnectionService),
        ),
        required_services=['database'],
    )
You can then set a crontab like this:
crontab -e
and enter something like this to trigger the script every 10 minutes:
# m h  dom mon dow   command
MAILTO=james@example.com
*/10 * * * * /home/example-staging/env/bin/python /home/example-staging/lib/CarbageSite/code/trunk/examplesite/cron/period.py /home/example-staging/lib/CarbageSite/deploy/ve6.fourier.3aims.com/example-staging/app.conf
CGI Optimisations
It is possible to run entire Flows applications as CGI scripts but this is obviously not as fast as deploying flows through mod_wsgi. The major overhead for each request under a CGI deplpyment is the cost of creating the Python process and loading all the modules.
In flows, you only need to import modules used for a particular request so in your dynamic/service.py file you can replace the imports with functions. eg:
def on_load_service_lexicon(flow, name):
    from some.lexicon.module import LexiconService
    return LexiconService()

def on_load_services(flow):
    available_services = dict(
        lexicon =  on_load_service_lexicon,
    )
    return available_services
Now, the some.lexicon.module is only imported if the lexicon service is needed. Changing all services to use this approach can speed up server reload and CGI script performance but will not speed up a CGI deployment.
Writing Flows Commands
Have flow.cmd in the handler with the data we are talking about.
CommandTool areas for improvement: * Handler API should take a flow * Config file parsing could be automatic before the flow * How do you handle –app.serve options etc?
Using Extension Components
Writing Flows code in JavaScript
Replacing the response entirely
Flows is designed to make easy things easy and complex things possible. If you are doing something more complex than just returning strings you can actually replace the response object too. The rule is that if you are replacing the reponse object with anything other than a plain Python list, Flows will not help you and you will be entirely responsible for what happens to that response. This means that replacing the response with anything other than a plain list is only for experts.
Here’s an example where we replace the response object with another list:
# -*- coding: utf8 -*-

flow.http.response = [u"السلام عليكم"]
This code works exactly as before because it is an ordinary Python list.
Streaming Data
import time

status = flow.http.status

def one_at_a_time():
    """\
    The one at a time function cannot access the flows object baceause it has
    already been destroyed by the time it is called. This means that
    generators must also correctly encode their content
    """
    yield (u"A: hello world! "+ status).encode('utf-8')
    time.sleep(5)
    yield (u"ﻞﺳﻼﻣ ﻊﻠﻳA: goodbye world! " + status).encode('utf-8')

flow.http.response = one_at_a_time()
| [1] | Unless you disable the functionality in the config file with app.enable_scripts = False |
| [2] | See Adding New Services to find out how to add the http.query service. |
Starting and Stopping Services
If you start a service yourself, you are responsible for stopping it!