Embedded Linux Server: Midge and the Edimax BR6104K(P)
| Posted: | 2008-02-10 22:52 |
|---|---|
| Tags: | Web, Debian, Embedded |
I've been chatting with Trevor (a colleague from work and the person who introduced me to diving) about the possibilities for modifying the firmware on simple router boards to do useful things in the home.
This page will document the progress I've made and the things I needed to buy to get it to work.
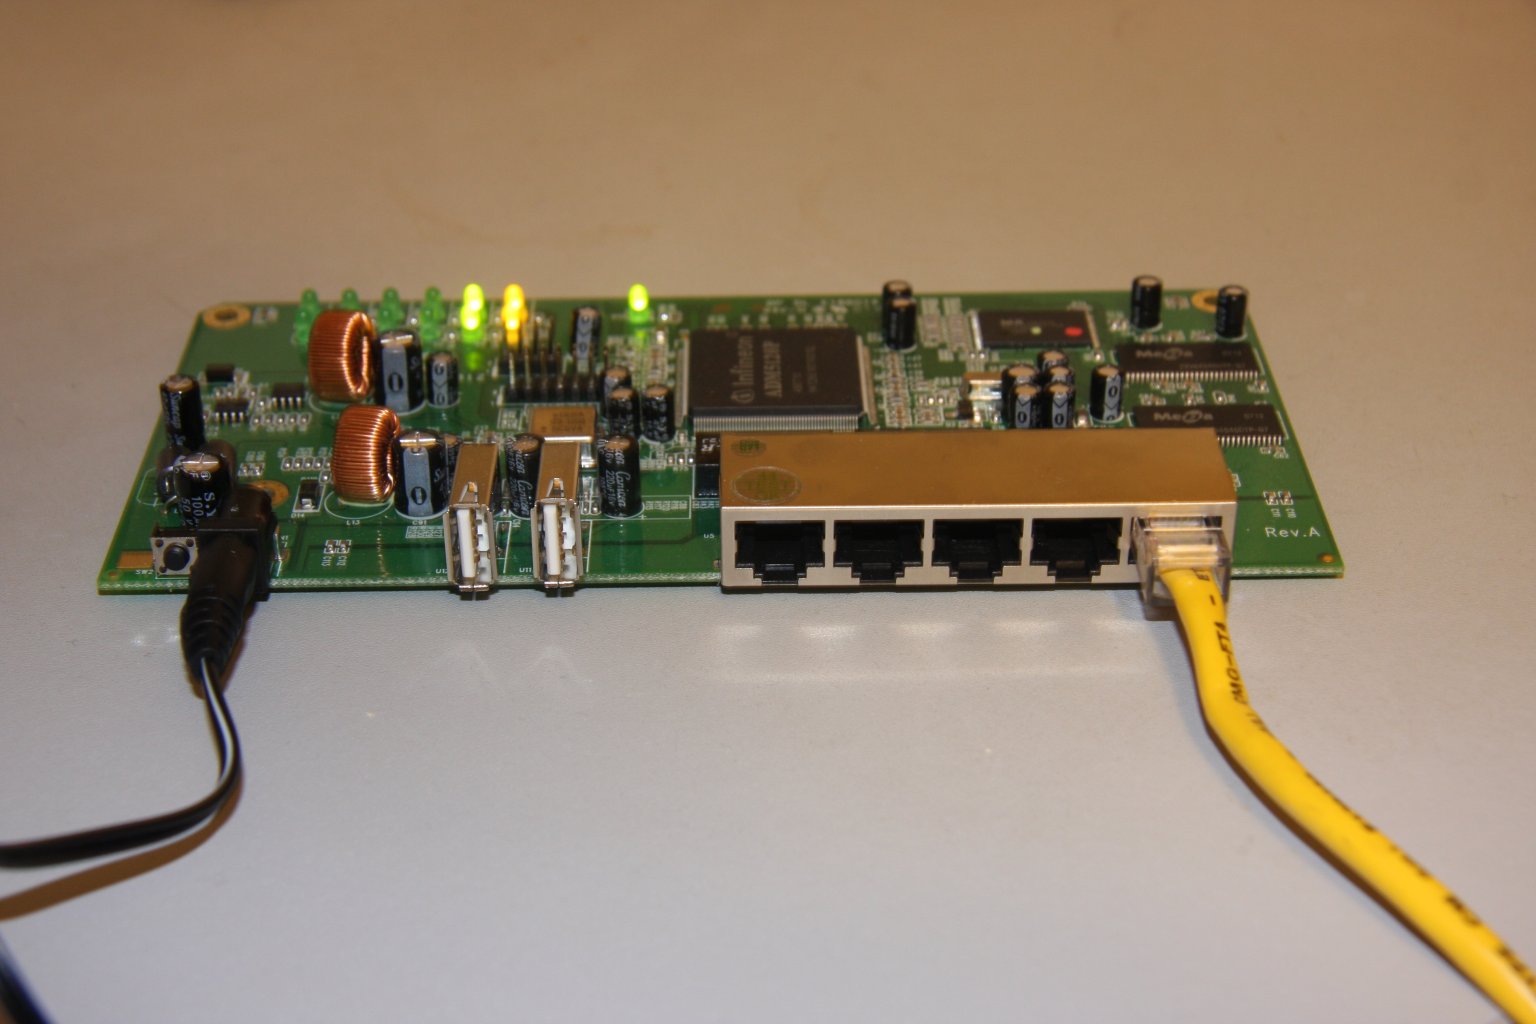
First of all you'll need a router board. I chose the Edimax BR6104K(P) board which has an adm5120 processor, 16MB of RAM and 2MB of flash. Most usefully it comes with two USB headers already attached and is available in the UK for about £22 inc VAT from http://www.omnima.co.uk/store/catalog/Embedded-controller-p-16140.html
It comes with a power adapter and a few printed sheets which don't really give you any more information than is already available on the website. One important thing to note is that the board come pre-installed with Midge, a derivative of OpenWRT which is a linux-based operating system designed so that it can be built automatically on a linux PC using GNU tools to enable you to produce your own firmware. This makes it a brilliant choice for anyone who wants to experiment with an embedded platform.
Out of the box, the board is configured like this:
root@midge:~# cat /etc/network/interfaces
# Configure Loopback
#
auto lo
iface lo inet loopback

auto eth0
iface eth0 inet dhcp

auto eth1
iface eth1 inet static
    address 192.168.1.1
    netmask 255.255.255.0

auto eth2
iface eth2 inet static
    address 192.168.2.1
    netmask 255.255.255.0

auto eth3
iface eth3 inet static
    address 192.168.3.1
    netmask 255.255.255.0

auto eth4
iface eth4 inet static
   address 192.168.4.1
   netmask 255.255.255.0
This means all the ports except eth0 are configured with fairly useless static IP addresses. The kernel routing table looks like this:
Kernel IP routing table
Destination     Gateway         Genmask         Flags Metric Ref    Use Iface
192.168.4.0     *               255.255.255.0   U     0      0        0 eth4
192.168.3.0     *               255.255.255.0   U     0      0        0 eth3
192.168.2.0     *               255.255.255.0   U     0      0        0 eth2
192.168.1.0     *               255.255.255.0   U     0      0        0 eth1
If you want to be able to sign in to the operating system running on the board you will therefore need to plug eth0 into your router so that the board can obtain an IP address. The silly thing is that the ports are numbered 0-4 as you look at the board starting from the right so eth0 is the right-most Ethernet socket. The appropriate LEDs come on once you plug it in. Once plugged in you'll need to restart the router otherwise it doesn't trigger DHCP.
After less than a minute you'll be able to sign in with SSH. You'll have to check your router's DHCP table to find out which IP address it assigned the board. Once you've found out use SSH to sign in with the username root and the password midge and this is what you'll see:
james@bose:~$ ssh root@192.168.1.3
The authenticity of host '192.168.1.3 (192.168.1.3)' can't be established.
RSA key fingerprint is 71:ed:8e:16:24:39:d9:93:28:cd:3e:ee:3a:e1:89:8c.
Are you sure you want to continue connecting (yes/no)? yes
Warning: Permanently added '192.168.1.3' (RSA) to the list of known hosts.
root@192.168.1.3's password:


BusyBox v1.1.2 (2007.06.07-14:35+0000) Built-in shell (ash)
Enter 'help' for a list of built-in commands.

         _nnnn_
        dGGGGMMb
       @p~qp~~qMb
       M|@||@) M|
       @,----.JM|
      JS^\__/  qKL                 _     _
     dZP        qKRb     _ __ ___ (_) __| | __ _  ___
    dZP          qKKb   | '_ ` _ \| |/ _` |/ _` |/ _ \
   fZP            SMMb  | | | | | | | (_| | (_| |  __/
   HZM            MMMM  |_| |_| |_|_|\__,_|\__, |\___|
   FqM            MMMM                     |___/
 __| ".        |\dS"qML
 |    `.       | `' \Zq
_)      \.___.,|     .'
\____   )MMMMMP|   .'
     `-'       `--' hjm


kamikaze (c) OpenWrt Team 200x-2006
midge (c) Vladislav Moskovets 2005-2006

Revision: r728
Builded at: 20070607 14:53

root@midge:~#
As you can see we have the 20070607 firmware which corresponds to revision 728 from the source tree at http://midge.vlad.org.ua/svn/trunk/
You can also see we have BusyBox v1.1.2 which is a set of command-line tools which behave very similarly to their GNU counterparts but are designed to be run on much leaner devices (ours only has 2Mb of storage remember).
Now you have signed in you can have a play, ping google etc.
One thing to be aware of is that there are a large number of iptables firewall walls set up by the /etc/init.d/S60fw script which don't seem very sensible to me because they appear to have been hardcoded for a particular gateway. They'll probably need changing if you want to be able to access the board on any port other than SSH or for pinging otherwise the kernel will simply drop the packets. This is a pain if you want to run a web server for example.
If you can't sign into the board it is likely that your network configuration is conflicting in some way with this default setup as mine was to start with. The only solution is to build the serial cable mentioned later so that you can re-configure the network settings. Here's what I had to run for the system to work on eth0 with my router (192.168.1.1):
ifdown eth0
ifdown eth1
ifdown eth2
ifdown eth3
ifdown eth4
ifup eth0
echo "nameserver 192.168.1.1" > /etc/resolv.conf
After that the basics worked fine. Some firewall configuration might be needed though depending on what you are trying to do.
Default Setup
Let's have a look around the default install:
The fstab looks like this:
# /etc/fstab: static file system information.
#
# <file system> <mount pt>      <type>          <options>                       <dump>  <pass>
# /dev/root     /               ext2            rw,noauto                       0       1
proc            /proc           proc            defaults                        0       0
devpts          /dev/pts        devpts          defaults,gid=5,mode=620         0       0

root@midge:~# cat /proc/cpuinfo
system type             : ADM5120 Demo Board
processor               : 0
cpu model               : MIPS 4Kc V0.11
BogoMIPS                : 174.48
wait instruction        : yes
microsecond timers      : yes
tlb_entries             : 16
extra interrupt vector  : yes
hardware watchpoint     : yes
VCED exceptions         : not available
VCEI exceptions         : not available

root@midge:~# cat /proc/filesystems
nodev   rootfs
nodev   bdev
nodev   proc
nodev   sockfs
nodev   tmpfs
nodev   shm
nodev   pipefs
nodev   ramfs
nodev   devfs
nodev   devpts
        squashfs
        ext2

root@midge:~# cat /proc/meminfo
        total:    used:    free:  shared: buffers:  cached:
Mem:  15101952 12439552  2662400        0  1212416  5296128
Swap:        0        0        0
MemTotal:        14748 kB
MemFree:          2600 kB
MemShared:           0 kB
Buffers:          1184 kB
Cached:           5172 kB
SwapCached:          0 kB
Active:           3684 kB
Inactive:         2700 kB
HighTotal:           0 kB
HighFree:            0 kB
LowTotal:        14748 kB
LowFree:          2600 kB
SwapTotal:           0 kB
SwapFree:            0 kB

root@midge:~# cat /proc/version
Linux version 2.4.32 (root@builder) (gcc version 3.4.5 (OpenWrt-2.0)) #2 Thu Jun 7 14:51:02 UTC 2007
It is worth noting that any changes you make to the router a lost when you power cycle it unless you type flash save to save the changes.
Building a Cable
To be able to upgrade the firmware (or even to be able to connect to the board if the default network settings aren't working for you) you will need to build a serial cable. This isn't particularly straightforward because the voltages on the board and the serial connection on your computer are different so you need to build a simple circuit to adjust the voltages.
To make your own lead, you'll need some bits and pieces:
MAX3232ECPE chip for adjusting the voltages between the board and the serial port so it is a valid RS232 connection: Maplin (check stock) http://www.maplin.co.uk/module.aspx?ModuleNo=11979&doy=search
RS232 plug Maplin: RK60Q or chop the end off an existing lead with a 9-pin D-type plug. (Note this is not the one you'd plug directly into the PC serial port but its inverse so that you can easily add an extension cable. If you want to plug in directly you'll need a female 9-pin plug)
A breadboard or if you like soldering, a pre-drilled board
Soldering iron, solder and wire for soldering the wires to the 9-pin plug
4 x 0.1 micro farad ceramic capacitors (Maplin BX03D)
IDC header (maplin JB59 is 2x5 pin, will work but 2x4 pin is better) (These are the black headers you get on the ends of ribbon cables for plugging hard drives into motherboards etc. The board has a 2x4 set of pins so a 2x4 IDC header would be best. I actually used an old hard disk ribbon cable whose IDC header was obviously much to long but there are no other electronics in the way so this is OK)
Strip of ribbon cable 8 cables wide. You can always get a thicker one and tear it down the middle though.
Extension lead and two plugs so that you can connect your cable to a computer more easily.
Once you have all your components wire them altogether according to this circuit diagram provided by Trevor:
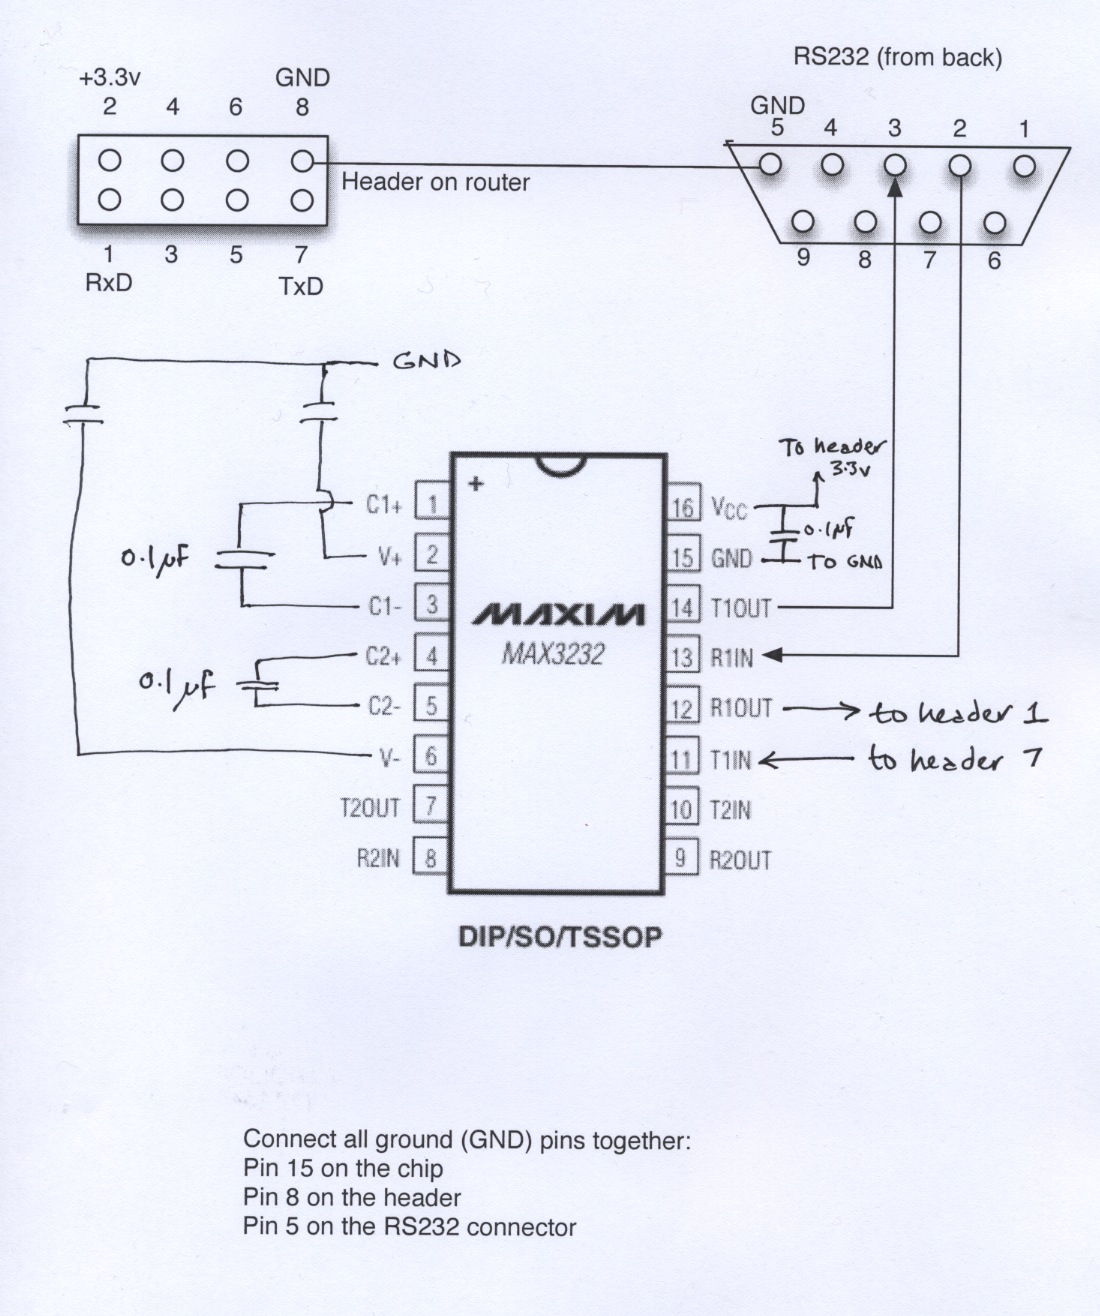
You might find the chip specifications on page 14 of this manual useful too: http://datasheets.maxim-ic.com/en/ds/MAX3222-MAX3241.pdf
If things don't work, double check all your connections, the circuit does work.
Connecting via the Serial Cable
To connect to the board using your cable you'll need minicom:
sudo apt-get install minicom
You'll then need to set it up to use your serial port (probably /dev/ttyS0) and with hardware flow control disabled. Here's how:
sudo minicom
Now change some settings. Press Ctrl+A then o:
+-----[configuration]------+
| Filenames and paths      |
| File transfer protocols  |
| Serial port setup        |
| Modem and dialing        |
| Screen and keyboard      |
| Save setup as test       |
| Save setup as..          |
| Exit                     |
+--------------------------+
Choose Serial port setup then press A to change the Serial Device to the correct one, probably /dev/ttyS0. Press E to change the Bps/Par/Bits setting to 115200 8N1 and press F to change Hardware Flow Control to No. It should now look like this:
+-----------------------------------------------------------------------+
| A -    Serial Device      : /dev/ttyS0                                |
| B - Lockfile Location     : /var/lock                                 |
| C -   Callin Program      :                                           |
| D -  Callout Program      :                                           |
| E -    Bps/Par/Bits       : 115200 8N1                                |
| F - Hardware Flow Control : No                                        |
| G - Software Flow Control : No                                        |
|                                                                       |
|    Change which setting?                                              |
+-----------------------------------------------------------------------+
        | Screen and keyboard      |
        | Save setup as test       |
        | Save setup as..          |
        | Exit                     |
        +--------------------------+
Press Esc to exit the menu and then choose Save setup as.. and give it the name edimax. From now on, whenever you want to connect to the board you can just type:
sudo minicom edimax
To exit minicom type Ctrl+A followed by q.
You can now login with username root and password midge. If you power cycle the router you'll also be able to see it boot.
Installing Extra Software
Midge comes with a package manager which allows you to install extra software. You'll need to run this command to get the latest list though and networking must obviously be working by now, try pinging google.com if you have any problems:
ipkg update
Find out which software is available with:
ipkg list | more
Search for vfat package with:
ipkg list | grep vfat
Install the elinks and libopenssl packages with:
ipkg install elinks libopenssl
You get the idea.
Building Custom Firmware
The real fun starts when you can build your own firmware. First install the tools you need:
sudo apt-get install make libc6-dev gcc g++ patch zlib1g-dev libncurses5-dev libssl-dev flex bison sharutils subversion python gettext autoconf2.13 pkg-config
Then check out the source:
svn co http://midge.vlad.org.ua/svn/trunk/openwrt-midge
Now copy the config file you wish to build:
cd openwrt-midge
cp target/linux/adm5120-2.4/openwrt-config-midge-cirouter .config
make menuconfig DEVELOPER=1
make V=99
The build system will now download source versions of all the tools it needs and compile them so that they can cross compile to the ADM5120 platform (it can't just use the i386 versions since the target processor is not i386). This takes about an hour but once it is done it will build the firmware. Any future builds will be a lot quicker.
The firmware files are in the bin directory:
-rw-r--r-- 1 james james 1901568 2008-02-09 23:11 openwrt-adm5120-2.4-squashfs.bin
-rw-r--r-- 1 james james 1901568 2008-02-09 23:11 openwrt-adm5120-2.4-squashfs.bin.csys
The .bin file is for testing the firmware in RAM. The .bin.csys version is for installing to flash.
Uploading Firmware
To transfer the firmware plug in the serial cable you made and start minicom. You'll need to set up minicom so that hardware flow control is off as described earlier. Get minicom connected and turn off the board. As soon as you turn the router on press SPACE three times in succession. You have about two seconds to do this otherwise the bootloader boots the standard firmware. If successful you'll see this:
Linux Loader Menu
=======================
(a) Download vmlinuz to flash ...
(b) Download vmlinuz to sdram (for debug) ...
(c) Exit
We just want to test our firmware so we choose option (b) to start with. It will say:
Downloading.........
Next you need to use xmodem to transfer the file. This can be a bit temporamanetal so experiment with the delays and the number of key presses. I find if I wait for about 8 seconds (or until 8 characters are displayed) then press the up arrow a few times the transfer usually works. After you've done the waiting and the up arrow pressing press Ctrl+A followed by s to have minicom send a file. Choose the xmodem protocol then enter the path to the .bin version of the firmware.
Note
You don't have too much time to do this before it times out so you might want to put the firmware somewhere close to the directory you ran minicom from to save on typing.
If all goes well the firmware will start transferring:
+-----------[xmodem upload - Press CTRL-C to quit]------------+
|Xmodem sectors/kbytes sent:   0/ 0kRetry 0: NAK on sector    |
|Retry 0: NAK on sector                                       |
|Retry 0: NAK on sector                                       |
|Retry 0: NAK on sector                                       |
|Retry 0: NAK on sector                                       |
|Retry 0: NAK on sector                                       |
|Xmodem sectors/kbytes sent: 11764/1470k                      |
+-------------------------------------------------------------+
Once transfer is complete it will play a short tune and display this:
+-----------[xmodem upload - Press CTRL-C to quit]------------+
|Retry 0: NAK on sector                                       |
|Retry 0: NAK on sector                                       |
|Bytes Sent:1901568   BPS:7826                                |
|                                                             |
|Transfer complete                                            |
|                                                             |
| READY: press any key to continue...                         |
+-------------------------------------------------------------+
Then it will boot the firmware you loaded into RAM, once again you can sign in with root and midge:
root@midge:~# uname -a
Linux midge 2.4.32 #2 Sat Feb 9 23:09:17 GMT 2008 mips unknown

root@midge:~# cat /proc/version
Linux version 2.4.32 (james@bose) (gcc version 3.4.5 (OpenWrt-2.0)) #2 Sat Feb 9 23:09:17 GMT 2008
This time you are running your own firmware, congratulations.
USB Disk Access
To get more storage space you can plug a USB flash drive or hard disk into one of the USB 1.1 ports. Most of these devices are formatted with a FAT filesystem so you'll need to ensure the board has the necessary kernel modules to deal with USB and the FAT filesystem. Here are the commands you need:
ipkg install kmod-fs-ext2
ipkg install kmod-usb-core
ipkg install kmod-usb-ohci
ipkg install kmod-usb-shci
ipkg install kmod-usb-storage
ipkg install kmod-fs-vfat

insmod scsi_mod
insmod sd_mod
insmod ext2
insmod usbcore
insmod usb-storage
insmod usb-shci
insmod fat
insmod vfat
You'll probably find that many of these are already present. Once you've got the required software you can mount the disk:
mkdir /mnt/usbdisk
mount /dev/scsi/host0/bus0/target0/lun0/part1 /mnt/usbdisk
You can work out the device to mount because when you plug in the disk you'll see something like this printed by the kernel to the serial cable:
hub.c: new USB device adm5120-hcd-1, assigned address 2
scsi0 : SCSI emulation for USB Mass Storage devices
  Vendor: Kingston  Model: DataTravelerMini  Rev: PMAP
  Type:   Direct-Access                      ANSI SCSI revision: 02
Attached scsi removable disk sda at scsi0, channel 0, id 0, lun 0
SCSI device sda: 2015232 512-byte hdwr sectors (1032 MB)
sda: Write Protect is off
Partition check:
 /dev/scsi/host0/bus0/target0/lun0: p1
The last line tells you that you are using partition 1 of device /dev/scsi/host0/bus0/target0/lun0.
You can now read and write to the drive (although it is a bit slow because it is USB 1.1, not 2.0):
root@midge:~# ls /mnt/usbdisk
Essentials                     otp_mibs.pdf
debugger.pdf                   programming_examples.pdf
design_principles.pdf          reference_manual.pdf
docbuilder.pdf                 runtime_tools.pdf
edoc.pdf                       sasl.pdf
efficiency_guide.pdf           snmp.pdf
erts.pdf                       ssh.pdf
getting_started.pdf            ssl.pdf
inets.pdf                      system_architecture_intro.pdf
james.txt                      system_principles.pdf
mnesia.pdf                     tools.pdf
mnesia_overview.pdf            tutorial.pdf
odbc.pdf                       webtool.pdf
otp_doc_html_R12B-0.tar.gz
Building a More Useful Firmware
I want to run a web server on my board so I'm going to compile a firmware with the BusyBox httpd program and the haserl package installed. I'd have liked to install the bluetooth tools too but doing this makes the firmware too big to install on the board with the standard bootloader (the firmware I compiled was about 1.45Mb).
KERNEL_MAXSIZE=655360 (640k) SQUASHFS_MAXSIZE=1245184 (1216k)
You can't add the BusyBox httpd program as a package because the whole of BusyBox has to be compiled at once. To create the firmware run these commands again (any existing firmware in the bin directory will be over-written):
make clean
cp target/linux/adm5120-2.4/openwrt-config-midge-cirouter .config
make menuconfig DEVELOPER=1
Go into OpenWrt Package Selection ---> `` then ``Base system ---> then busybox then `` Busybox Configuration`` then Networking Utilities and select httpd so it has a * character by it. This also takes you slightly over the limit so I went through the other options and removed clear, sed, awk, more and xargs which I didn't expect to need. which, grep and hexdump are required so don't remove them even if it is tempting to do so.
Exit all the way out of the program and save the configuration. Then build it with this command (the V=99 means maximum verbosity):
make V=99
Once the firmware is built you'll want to write it to the board. Connect the serial cable, turn the rooter off and on and press three times to get the menu as before. This time though choose option (a) to save the firmware to flash. You follow exactly the same procedure as before except you choose the .bin.csys version of the firmware and after the upload is done you'll see this:
Downloading.........||||||PASS

Eraseing nor flash.......PASS

Programming nor flash...PASS
If you turn the router on and off and on again it will boot the new firmware and once you sign in with root and midge again you'll get this:
BusyBox v1.1.2 (2008.02.10-14:44+0000) Built-in shell (ash)
Enter 'help' for a list of built-in commands.

         _nnnn_
        dGGGGMMb
       @p~qp~~qMb
       M|@||@) M|
       @,----.JM|
      JS^\__/  qKL                 _     _
     dZP        qKRb     _ __ ___ (_) __| | __ _  ___
    dZP          qKKb   | '_ ` _ \| |/ _` |/ _` |/ _ \
   fZP            SMMb  | | | | | | | (_| | (_| |  __/
   HZM            MMMM  |_| |_| |_|_|\__,_|\__, |\___|
   FqM            MMMM                     |___/
 __| ".        |\dS"qML
 |    `.       | `' \Zq
_)      \.___.,|     .'
\____   )MMMMMP|   .'
     `-'       `--' hjm


kamikaze (c) OpenWrt Team 200x-2006
midge (c) Vladislav Moskovets 2005-2006

Revision: r899
Builded at: 20080210 15:04
Notice the updated dated and version numbers.
Setting up the Web Server
Now that you have the new firmware with the http server you can configure it. Mount the USB drive to /mnt/usbdisk and create a new folder called www. Within www create a cgi-bin directory. Now edit /etc/httpd.conf to comment out the password protection on the cgi-bin directory so it looks like this:
D:172.28.202                # Deny address from 172.20.0.0/16
D:10.0.0.0/25               # Deny any address from 10.0.0.0-10.0.0.127
D:10.0.0.0/255.255.255.128  # Deny any address that previous set
#D:127.0.0.1                # Deny local loopback connections
A:*                         # Allow from other IP connections
#/cgi-bin:admin:123          # Require user foo, pwd bar on urls starting with /cgi-bin/
/adm:admin:setup            # Require user admin, pwd setup on urls starting with /adm/
/adm:toor:PaSsWd            # or user toor, pwd PaSsWd on urls starting with /adm/
.au:audio/basic             # additional mime type for audio.au files
*.php:/path/php             # running cgi.php scripts through an interpreter
Now we need a CGI script, we'll write it in C. Save this as test.c
#include <stdio.h>
int main(int argc, char** argv)
{
    printf("Content-Type: text/html\n\n<html>Hello Trevor!</html>\n");
    return 0;
}
You can compile it with:
/home/james/Desktop/openwrt-midge/staging_dir_mipsel/bin/mipsel-linux-uclibc-gcc -o test test.c
mipsel-linux-uclibc-gcc is the equivalent of gcc on the Linux PC and it seems to be able to find the headers and libraries it needs. You can now copy the output to the USB memory stick in the www/cgi-bin directory and ensure it has executable permissions by running chmod 755 test. Mount the USB drive on the board again and start the HTTP server:
httpd -d /mnt/usbdisk/www/
Finally change the firewall to allow port 80 by editing /etc/network/fw to add this line under the line for port 22:
$ADD INPUT $ACCEPT $TCP --dport 80
and reload the firewall rules:
/etc/init.d/S60fw restart
Now if you visit http://<your-board's-ip>/cgi-bin/test your CGI script should run to produce the message Hello Trevor!.
Bluetooth (Not Working)
Here's what I ran to try to get bluetooth working:
ipkg update
ipkg install kmod-bluetooth bluez-libs bluez-utils picocom

insmod bluez
insmod l2cap
insmod hci_usb
insmod rfcomm
insmod sco
insmod hci_uart
When I plug in the bluetooth dongle (a modern Belkin one) I get this message which doesn't bode well:
hub.c: new USB device adm5120-hcd-2, assigned address 3
usb.c: USB device 3 (vend/prod 0x50d/0x131) is not claimed by any active driver.
When I try to load the device the kernel crashes:
root@midge:~# hciconfig hci0 up
Unable to handle kernel paging request at virtual address 00000000, epc == c007b6f8, ra == c007bc9c
Oops in fault.c::do_page_fault, line 206:
$0 : 00000000 10008400 a0a53180 a0a53190 801c6800 0001a780 0094b7c4 00000011
$8 : 801fe600 80109638 00000000 8014c9d0 00000519 10008400 00000000 00000001
$16: 00000000 801b89e0 0094b7c4 80514414 00000011 00000004 0001a780 0094b780
$24: ba2e8ba3 8015e5b4                   808be000 808bfd90 801b89e0 c007bc9c
Hi : 00000002
Lo : 00000002
epc   : c007b6f8    Not tainted
Status: 10008402
Cause : 10800008
PrId  : 0001800b
Process hciconfig (pid: 2201, stackpage=808be000)
Stack:    00000001 a0a7a2c0 80514414 00418280 80514454 00000004 00000000
 80514414 000000aa 801c6800 01000000 c007bc9c 801a81cc 809d3a40 ffffffbf
 801553c0 80514414 00000004 00000011 801c6800 801b89e0 10008400 a0a53180
 801c6800 00000000 a0a7a2c0 80514414 00418280 80030000 c007d2fc 8090903c
 809d3c20 0040f184 80f79520 809d3c20 80035214 802519a0 2ab9c200 809d3c20
 801a84e4 ...
Call Trace:   [<c007bc9c>] [<80030000>] [<c007d2fc>] [<80035214>] [<c0130000>]
 [<80030000>] [<c0137778>] [<c012d388>] [<800448c9>] [<80049fb8>] [<80049fb8>]
 [<8009fa6c>] [<80009bc0>] [<80109224>] [<800448c9>] [<8005c80c>]

Code: 00151880  00621821  8c700030 <8e020000> 04410005  3c028001  3c04c008  24424534  0040f809
Segmentation fault
Looks like I'll have to save bluetooth for another day. Some clues though:
http://midge.vlad.org.ua/forum/viewtopic.php?t=461&sid=84bdddddb305bc7b25950c6975d95910 http://forum.amilda.org/viewtopic.php?pid=649 http://midge.vlad.org.ua/forum/viewtopic.php?p=4357&sid=a4c2a20158761bbea68efab649f43e39
Links
http://www.maxim-ic.com/quick_view2.cfm/qv_pk/1068/ln/en http://midge.vlad.org.ua/wiki/article http://downloads.openwrt.org/kamikaze/docs/openwrt.html http://forum.amilda.org/viewtopic.php?id=37 http://midge.vlad.org.ua/wiki/flash_save http://www.student.tue.nl/Q/t.f.a.wilms/adm5120/ http://midge.vlad.org.ua/wiki/usb